• For Assignment 3 we had four different tasks, each a combination of code and hardware. In this post I will begin with an explanation, show my code, and then link to the video.

    Part 1:

    We were tasked with adding a second LED and make them flash like a railroad crossing. I did this using a delay in between the on and off for the individual pins but no delay in between the two pins.

    void setup() {
      // put your setup code here, to run once:
      pinMode(13, OUTPUT);
      pinMode(11, OUTPUT);
    }
    
    void loop() {
      // put your main code here, to run repeatedly:
      digitalWrite(13, HIGH);     // turn led on (high is voltage level)
      delay(1000);                 // wait for 1 second
      digitalWrite(13, LOW);      // turn led off by making voltage low
      digitalWrite(11, HIGH);     
      delay(1000);                 
      digitalWrite(11, LOW);      
    }

    Part 2:

    Next I added a third LED, and did an airport landing strip. I found this to be fun and interesting, I definitely am wondering what else I could do and looking forward to learning more.

    void setup() {
      pinMode(13, OUTPUT);
      pinMode(11, OUTPUT);
      pinMode(9, OUTPUT);
    }
    
    void loop() {
      digitalWrite(13, HIGH);     // turn led on (high is voltage level)
      delay(100);                 // wait for .1 second
      digitalWrite(13, LOW);      // turn led off by making voltage low
      digitalWrite(11, HIGH);     
      delay(100);                 
      digitalWrite(11, LOW);     
      digitalWrite(9, HIGH);
      delay(100);
      digitalWrite(9, LOW);
      delay(2000);
    }

    Part 3:

    Next, I changed the numbers in the delay to be a variable, rather than a hard coded number. The var variable increments by 400 each time the loop runs, and once it reaches 2000 it will reset and go back to 0. The video shows how it gets slower between the lights blinking and then eventually gets faster again.

    int var = 0;
    
    void setup() {
      pinMode(13, OUTPUT);
      pinMode(11, OUTPUT);
      pinMode(9, OUTPUT);
    }
    
    void loop() {
      digitalWrite(13, HIGH);     // turn led on (high is voltage level)
      delay(var);                 // wait for var
      digitalWrite(13, LOW);      // turn led off by making voltage low
      digitalWrite(11, HIGH);   
      delay(var);              
      digitalWrite(11, LOW);
      digitalWrite(9, HIGH);
      delay(var);
      digitalWrite(9, LOW);
      if(var<2000){
        var += 400;
      }
      else{
        var = 0;
      }
    }

    Part 4:

    Finally, we used a fritzing diagram provided to us to make sure we understood how to orient the LEDs and the wires to make a more simple circuit. The LEDs also blink back and forth, similarly to part 1, but with much fewer wires and much less complicated. It uses the wires to switch back and forth between being an output wire or being a grounding wire.

    void setup() {
      pinMode(13, OUTPUT);
      pinMode(12, OUTPUT);
    }
    
    void loop() {
      digitalWrite(13, HIGH);
      delay(700);
      digitalWrite(13, LOW);
      digitalWrite(12, HIGH);
      delay(700);
      digitalWrite(12, LOW);
    }
  • creative brief google doc

    Below are my story boards. The arrows show movement, although some shaking/flashing etc is going to happen where I did not note. I anticipate this being a bit tedious with the number of words but I think the potential it has once there is color and motion is huge.

  • For the Kinetic Typography Project, I will be using the following video. I will be using from 0:49 to 1:41, or maybe a few seconds after. I think the dialog between Paul Rudd and the computer is hilarious, and will lend well to kinetic typography.

  • This assignment was a bit harder, and I definitely wanted to do more than I ended up accomplishing. However, I did get the mouse clicks to store after clicking and hitting a key, and then after that a different code would load it in and then show where you clicked. I was hoping to get it to a point where it would wait after each square and show in order where you would click.

    I also considered trying to get it into one file instead of two, but wasn’t able to do that either!

    I was overall happy with how it turned out but frustrated that I was unable to do more.

    int xCoord=400; 
    int yCoord=400;
    int numCoord = 0;
    PrintWriter mouseInput;
    
    void setup() {
      size(800, 800);
      mouseInput = createWriter("coordinates.txt");
    }
    
    
    void draw() {
      background(#15C2D3);
    
      textSize(20);
      text("Click around, then hit any key", 385, 370);
    
      square(xCoord-25, yCoord-25, 50);
    
      if (mousePressed && mouseX > 25 && mouseX < 775 && mouseY > 25 && mouseY < 775) {
    
        xCoord= mouseX;
        yCoord = mouseY;
        
        mouseInput.println(mouseX);
        mouseInput.println(mouseY);
        numCoord ++;
        delay(300);
      }
    }
    
    void keyPressed(){
      mouseInput.flush(); //flushes printWriter object, writes the data before it closes
      mouseInput.close();
      exit();
    }
    
    String [] coords; // square brackets indicates it's an array. multiple values in one
    void setup() {
      size(800, 800);
      coords = loadStrings("coordinates.txt");
      
      background(#15C2D3);
    }
    
    void draw(){
      textSize(15);
      text("This is where you clicked :)", 240, 240);
      
      for (int x = 0; x < coords.length; x += 2) {
        int y = x + 1;
        square(float(coords[x])-25, float(coords[y])-25, 50);
      }
    }
  • Our first assignment in Object was to explore processing and figure out different ideas. I ended up doing three different code snippets, with small things changed.

    1. I started with drawing squares when the mouse is pressed, with a random RGB color for each square and a white stroke.
    void setup() {
      // width, height
      size(1000, 800);
    
      // 0-255, R, G, B
      background(0);
    }
    
    void draw() {
    
      if (mousePressed) {
        // white outline
        stroke(255);
        // random RGB color between 1&255
        fill(random(1, 255), random(1, 255), random(1, 255));
        square(mouseX, mouseY, 25);
      }
    }
    

    2. I next wanted to experiment with shapes, and wanted to do a similar drawing feature with triangles. I ended up coming across this accidentally but really enjoyed how it functioned.

    void setup() {
      // width, height
      size(1000, 800);
    
      // 0-255, R, G, B
      background(0);
    }
    
    void draw() {
    
      if (mousePressed) {
        // white outline
        stroke(255);
        // random color
        fill(random(1, 255), random(1, 255), random(1, 255));
        // triangle using base point
        triangle(mouseX, mouseY, mouseX, 25, 25, 25);
      }
    }

    3. Another happy accident was similar to #2 but lines, rather than triangles. There is an attachment point and then the mouse click draws lines depending on where you click.

    void setup() {
      // width, height
      size(1000, 800);
    
      // 0-255, R, G, B
      background(255, 0, 0);
    }
    
    void draw() {
    
      if (mousePressed) {
        stroke(255);
        triangle(mouseX, mouseY, mouseX, mouseY, 0, 0);
      }
    }
    

    Finally, I was experimenting with trying to select a background color by moving the mouse around, but I was unsure how to make the code stop updating the background color (on click, or key press perhaps) and put something from draw( ) to setup( ). Not sure if this is possible, but it would be really interesting. I love the updating background color based on X, Y positions of the mouse.

    Overall, I had a lot of fun with this assignment and am looking forward to learning more about Processing and different types of outputs.

  • I picked Paramore’s Hard Times video. The simple yet intriguing start with the name Paramore is really fun to look at. But what I love most is how they bring together animation and the video of the band members. It makes the video fun and engaging, but also emphasizes the lyrics.

  • PART 1

    For my final project in form, I am going to build the Denver Art Museum.

    Denver Art Museum / Studio Libeskind | ArchDaily

    Below are my sketches. I’m still debating trying to do metal rather than paper. If I have to pick right now I’ll say I’m going to print pieces of paper out to start and then use them to transfer to a sheet of metal! I will then cut out pieces, trying to keep as many pieces together as I can.

    What I will need includes

    • Printer
    • Paper
    • Sheet of metal
    • Metal snips
    • A way to bend the metal along a line
    • Potentially soldering supplies

    IMG_6544

    PART 2

    Here’s my finished model. I’ve started trying to figure out the metal but I’m having a hard time thinking about how I’m going to put it all together. I wanted to just build each separate piece and then put them together but I don’t think that would work? I may end up having to cut after building so I think I would bend everything as much as I can and then put it together temporarily, see what would need to be cut and then go from there?

    Screen Shot 2020-04-15 at 3.50.00 PMScreen Shot 2020-04-15 at 3.50.14 PM

    Screen Shot 2020-04-07 at 3.12.43 PM

    PART 3

    I am pretty much done with my model. To finish it off, I really just want to make a platform to put it on. Partially because the bottom is pretty ugly, and partially because I think it would make it look nicer.

    Here is when I had folded all the pieces, and was preparing to put them all together.

    IMG_7134.jpg

    I really can’t tell you how difficult this was. I deep into the process realized that the final product would be mirrored, which I realized was due to how I cut out the metal from the printed paper.

    I also definitely hit a breaking point and ended up using aluminum duct tape on the outside rather than my previous plan of either soldering or taping the inside. Overall, I spent the majority of 3-4 days in a row working on the fabricated art museum. I am proud that I finished, but definitely wish I had planned more and had more time to figure out the ins and outs of metal working.

    .IMG_7153IMG_7154IMG_7155

    IMG_7215

    PART 4

    In the end, I would’ve definitely designed and created it differently. I think I could’ve had a much more polished piece if I had designed and planned more. I still plan on making a base for it but have not finished it yet.

    I put a gif to show the whole thing, but it’s shaky.

    gifdam

  • For my final project I wanted to design and build the Denver Art Museum, or rather the exterior. I had big goals of doing even more buildings from downtown Denver but even this proved to be harder than expected. I ended up rendering it to be wood and for the outdoor structures to be copper.

    Below is my model currently. I need to work on it some more but I am pretty happy with the shapes and how I’ve made each piece so far. If campus was still open I would probably try to laser cut this and make a pretty big model of it. I am currently planning to create the museum out of paper. Potentially cardboard? Not sure. I also attached a picture that I used from google street view to design it.

    Screen Shot 2020-04-07 at 3.12.43 PM

    Screen Shot 2020-04-07 at 11.30.00 AM

    These are my objects that would live outside the museum. I thought that taking something that was already there and altering it a little would be entertaining. I wanted to make the sweeping into the dust pan but did not have enough time.

    Screen Shot 2020-04-07 at 11.46.50 AM

    I used Fusion 360 to look at what my object would look like, and then looked at whether it would look good with paper folding. I think the building does lend itself to being modeled with paper as a lot of the pieces of the building are pointy. I would have done cuts probably 90 degrees from the top to do a laser cut if this was still possible.

    Screen Shot 2020-04-07 at 11.50.24 AMScreen Shot 2020-04-07 at 11.50.56 AM

  • Part A

    I modeled three objects in Rhino for Part A. First was the structure vessel in New York. This was an absolute pain, but I did the best I could. I started with one of the circles and then copied and scaled it.

    Screen Shot 2020-03-27 at 1.23.45 PM.png

    Second was a sword, I was hoping to get my friend to draw a sword for me so I could model it after that but I ended up just making a sword. I am not really happy with how this looks but I don’t frankly have the best idea of how a sword looks.

    Screen Shot 2020-03-27 at 1.23.55 PM.png

    Last was the dodecahedron. I first was trying to by hand make each pentagon, which went poorly. Next I tried to do an array around one pentagon using another pentagon. This didn’t work either. I finally just copied each face and then copied the bottom onto the top. When I ended up unrolling this, it didn’t work and I could not figure out why, so I unfortunately had to manually unroll it. None of my other objects would unroll either using the UnrollSrf command. I don’t know what I am doing wrong frankly.

    Screen Shot 2020-03-27 at 1.23.15 PM.png   Screen Shot 2020-03-27 at 1.23.25 PM.png

    Part B

    I hand cut my dodecahedron. I first forgot the tabs because they didn’t save from grasshopper. I then got the tabs from grasshopper, and printed on normal paper. I started by gluing all the sides together and this was not my best idea, but I ended up getting the dodecahedron (mostly) glued together.

    Part C

    I managed to get all of the 3D printed objects done before the school shut down. I did my sunglasses which was the real life model. I also printed a phone stand and a door hook.

    The sunglasses I had to print a few times because I made them too small to print the lenses at first, so it just printed the nose piece and the ear pieces. I finally scaled it up, which it doesn’t look fantastic but I think with how small they are they look pretty good.

    My phone holder works pretty well. It mostly works when the phone is horizontal, but it’s fantastic if you wanted to watch a movie.

    IMG_4803  
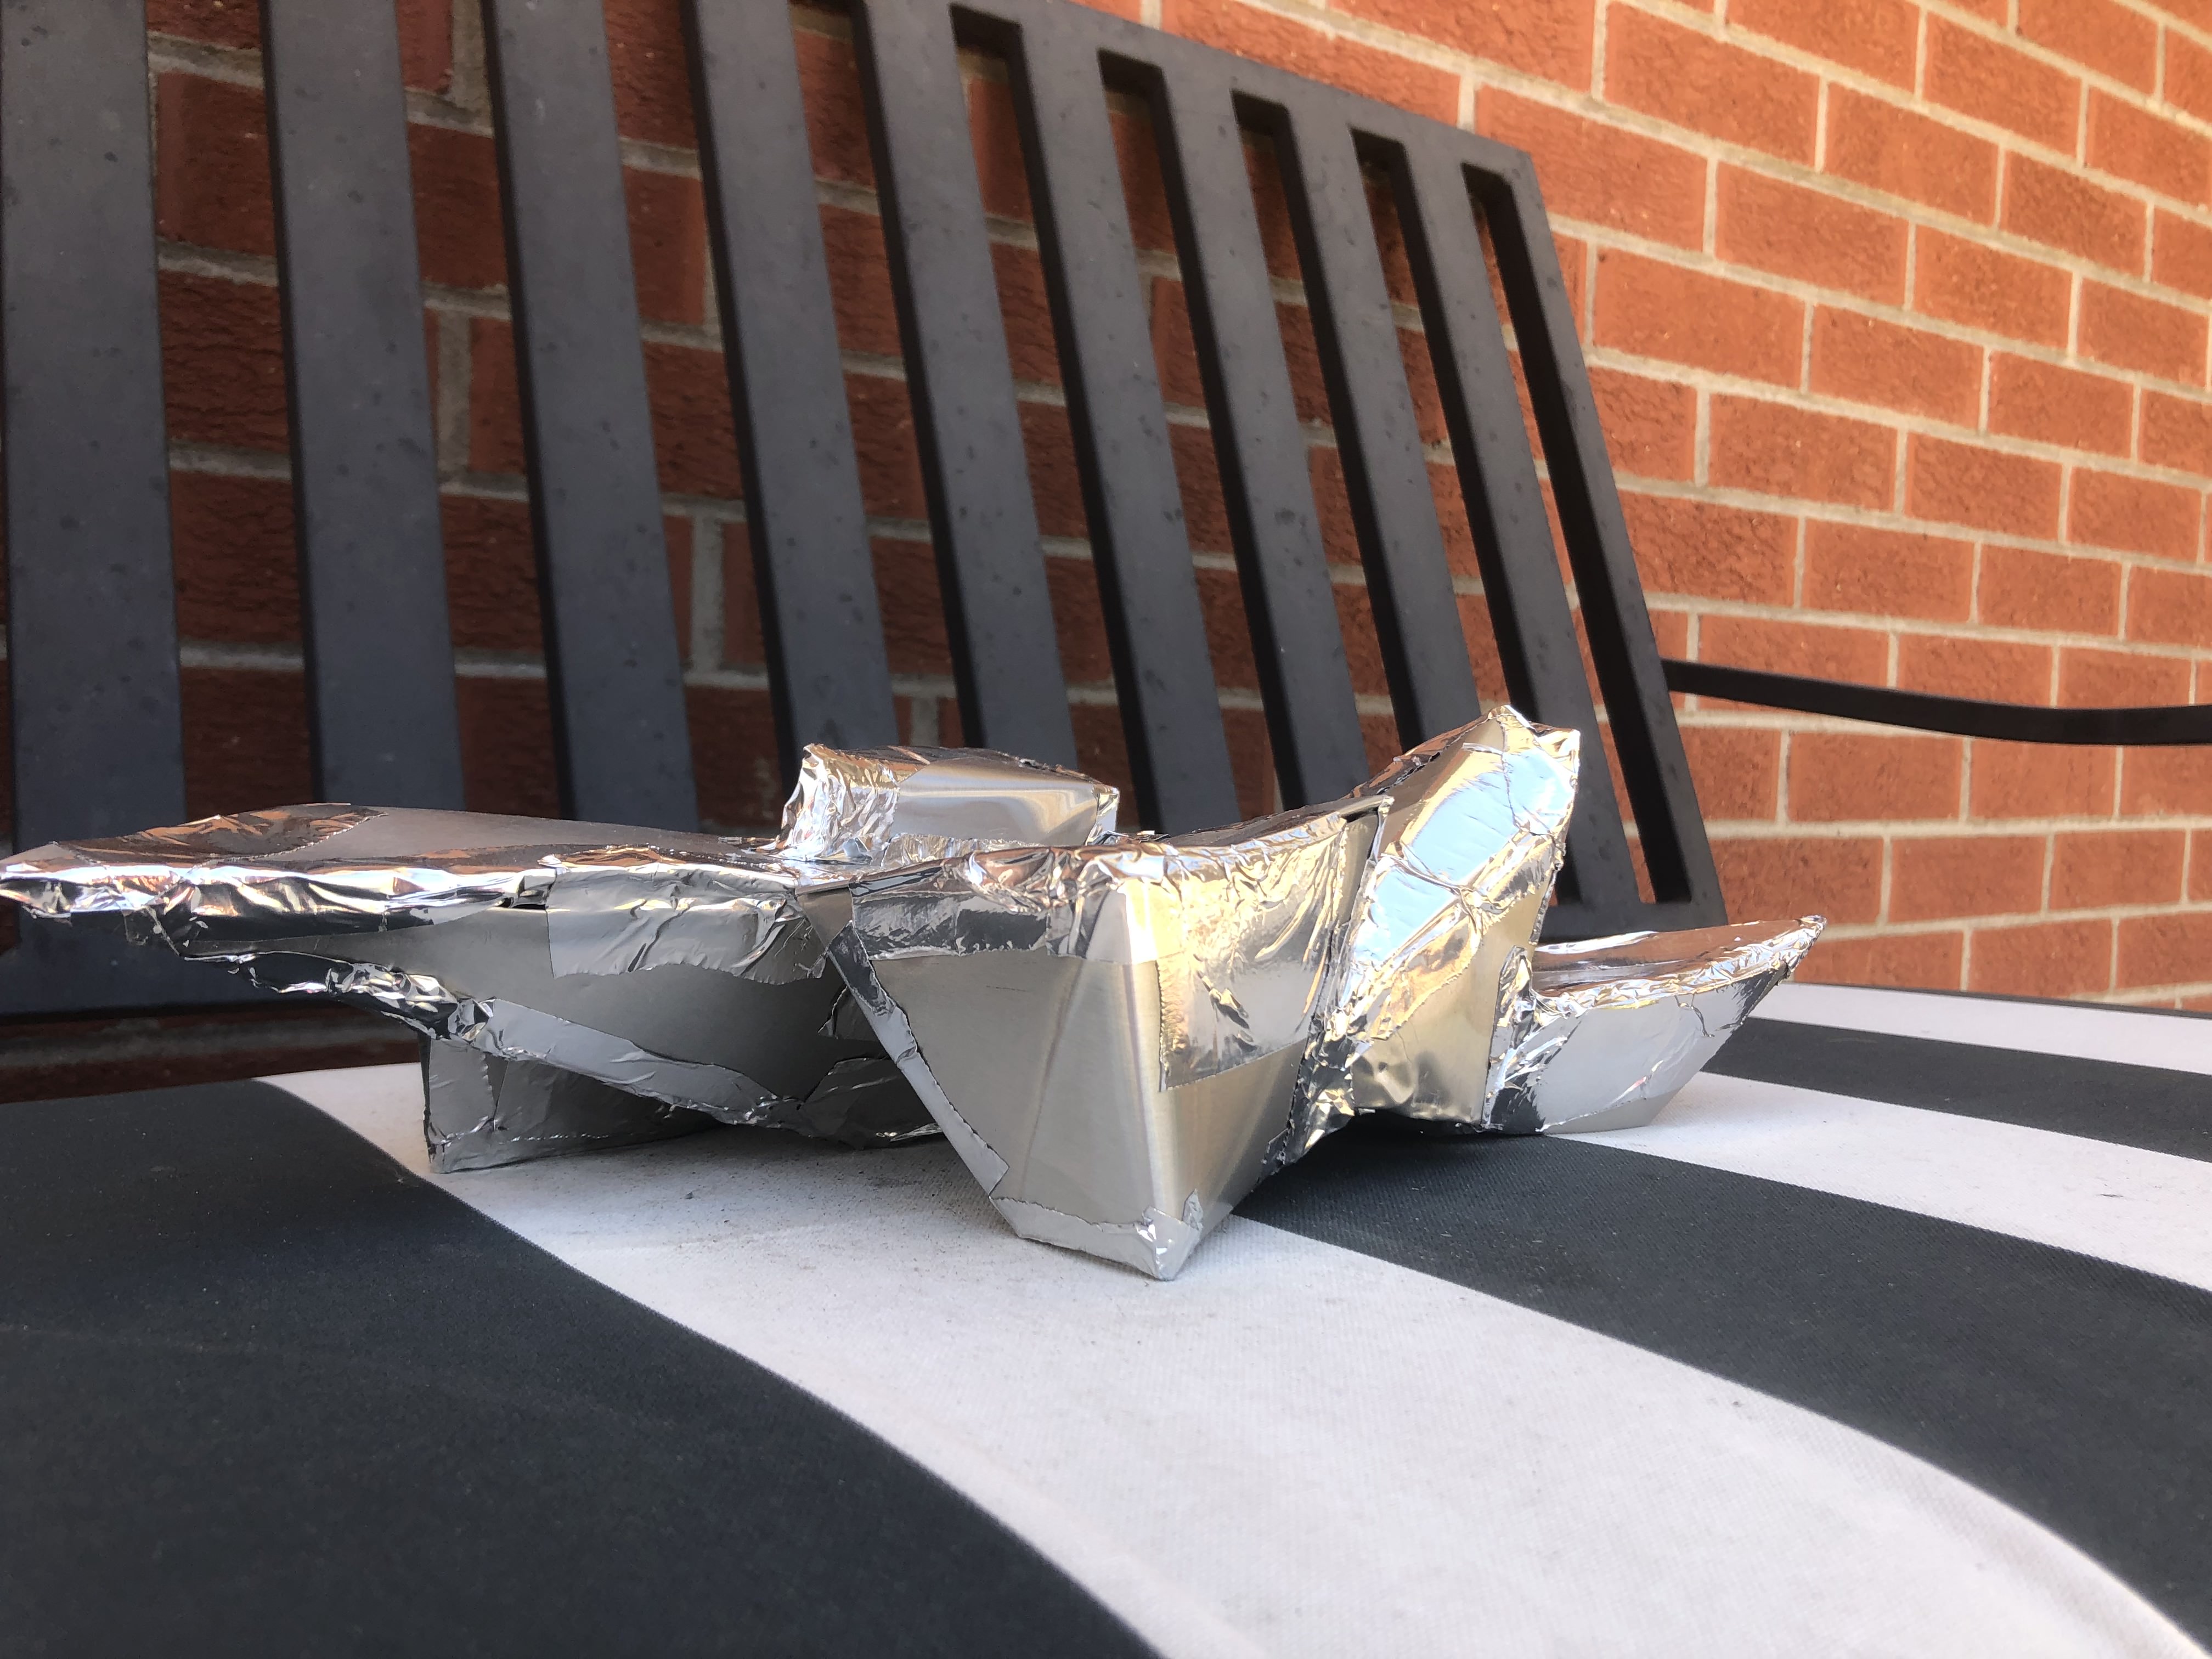
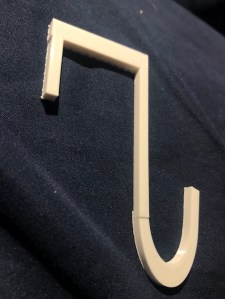
This is my door hook. I think if I had made the top part a little thinner it would’ve fit with the door closing better, but I am still happy with how it turned out.

  • Part A

    I ended up modeling my sunglasses. This proved harder than expected, but taught me plenty of new ways to think about how to model. Wearing the sunglasses later, I realized I didn’t get everything exactly right but it was a good practice for me.

    Part B

    I decided to do a UFO for part B. I didn’t expect it to take as long as it did to engrave and cut each piece for my UFO. I also forgot to make sure the thickness was correct in the slicer and so the UFO ended up being rather elongated, but I actually liked it more because of the elongation. I had a hard time deciding how to design the UFO, but my friend helped me make it “look less like a lamp.” I enjoyed putting the pieces of cardboard together, although it was tedious.

    Part C

    I had a bit of a hard time thinking of what to do for my second two objects mostly because I feel that the UFO is a stand alone object, but I decided to do its home planet, and the alien that would drive it. I had a lot of fun making the planet.

    Part D

    I did not know what I was doing with the joints. I had the hardest time doing the 90 degree angle. I thought that it was good designing it in rhino but when I ended up cutting it out it was very poor. Alas, I thought it was fun to try to mimic what was in the 50 digital joints and also take their ideas and do something that I thought would be more fun.